 Casey Ball, Regional Market Segment Director – Flooring, Sherwin-Williams Protective & Marine Coatings
When building a new food manufacturing facility or retrofitting an existing one, any construction downtime can interfere with the project’s overall productivity. Unfortunately, downtime is a given for nearly every discipline when the time comes to install or repair a resinous flooring system. To avoid contamination, you simply can’t do much else when installing flooring.
Applying a resinous flooring system likely means halting other construction activities and clearing personnel from the area to complete the multistep – often multiday – installation. To minimize project downtime, facilities can speed up their flooring installations by selecting products that enable a quick return to service. Such products include urethane concrete coatings that can allow foot traffic within four to eight hours of application and full service within six to 12 hours. The common alternative is to use conventional epoxy mortar systems, which typically require a 24-hour curing time before returning to service. The two systems also differ in their number of application steps and total installation times, with urethane systems offering enhanced efficiencies.
This article will review the primary application differences between conventional epoxy systems and urethane concrete systems and show how it’s possible to return a facility to full operation faster.
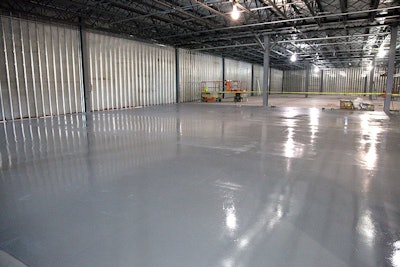
 Resinous flooring systems provide a continuous, seamless barrier that protects the underlying concrete substrate from degradation.
Getting Started
To compare conventional epoxy mortar and urethane concrete system installations, let’s use a 10,000-ft2 meat processing facility as an example. The size is a nice round number, and the environment will require the typical properties desired in a resinous flooring system, including anti-slip properties, cleanability, and resistance to chemicals, abrasions, moisture, impacts, and thermal shock. In addition, the crew size would be the same – about five to seven members – for both applications.
Installation of either flooring system cannot begin until the moisture vapor content of the concrete substrate is within acceptable limits for the chosen system. For a conventional epoxy mortar system, that wait time is at least 28 days after pouring concrete. Even then, installers will need to verify that the concrete’s moisture vapor content has sufficiently diminished. If not, the installation will be delayed further. Because urethane concrete systems are highly tolerant to moisture, the required wait time can be as little as three to five days. Therefore, installers can apply a urethane flooring system at least 23 days sooner than a conventional epoxy mortar system, offering the potential to greatly speed up construction timelines.
 Crews can topcoat a urethane (shown) or epoxy flooring system using squeegees, trowels, and rollers.
Reducing Installation Steps and Application Times
The enhanced application efficiency of a urethane flooring system comes mostly in the form of reduced steps and faster cure times compared to a conventional epoxy system. Both applications are similar on the front and back ends, with major differences in the intermediate steps.
Surface preparation for both systems is essentially the same, requiring mechanical abrasion of the concrete substrate to give it a rough, sandpaper-like finish that will enable proper bonding to the flooring system. Crews may cut, shot blast, grind, polish, scarify, scrape, strip, and/or acid etch the concrete to ensure it’s free from defects and contamination. Surface prep can vary depending on the condition of the concrete, but let’s assume one full eight-hour shift for the established five- to seven-member crew to prepare the 10,000-ft2 meat processing facility’s floor. The crew can begin subsequent steps immediately afterward.
The topcoating process is also similar between the two systems. Installers mix the materials in batches, pour them on the floor, and then squeegee, trowel, and roll them to a smooth, even finish. Topcoating would take about one full shift to complete for the sample facility.
Between the surface prep and topcoating steps, the two flooring systems differ in application efficiencies in terms of steps, material workability, and curing times. Conventional epoxy mortar systems require the application of primer, mortar, and grout coats before topcoating, while urethane systems only require the application of a slurry coat first. The grout and slurry coat applications are similar between the two flooring systems, but the mortar application is the most time-consuming and labor-intensive difference.
For a conventional epoxy mortar system, the primer coat fills in imperfections in the concrete and helps with bonding to the substrate. Using squeegees and rollers, the crew will likely take one shift to prime the sample facility floor. The primer will need to cure overnight unless the mortar is applied into the wet primer.
Next, the installers will apply the mortar bed by mixing sand and epoxy resin, dumping that mixture into a screed box, distributing the material evenly with rakes and trowels, and power troweling to leave a level, smooth substrate. The mortar typically combines over 50-70 pounds of aggregate with one gallon of resin, resulting in a thick, heavy mixture that doesn’t self-level and requires a lot of energy to smooth. The mortar application will take roughly eight to 10 or more hours, or one to two shifts, to complete.
After the mortar cures – usually overnight – installers will apply the grout coat, which fills in the porosity in the mortar. Installers can apply this coat in about one shift for the sample facility using squeegees, hand trowels, and brushes. Once the grout cures (about 12 hours later), installers are free to apply the topcoat as described above. The floor will be ready for full service 24 hours after applying the topcoat.
Forgoing the heavy mixing and tougher labor requirements for installing a mortar bed, urethane systems instead use a self-leveling, intermediate slurry coat. To apply this mix of resin and hardener, installers still use rakes and trowels. However, the slurry solution is much less viscous than the mortar, as it uses about half the aggregate (about 25 pounds) per gallon of resin. Therefore, the resin-rich mixture flows and levels much easier than the mortar mixture, reducing the energy required to apply this intermediate coat. The crew will be able to install a minimum of 1,000 ft2 of the slurry per hour, or more than 8,000 ft2 per shift. Therefore, installers may be able to complete the sample facility slurry application in one shift or just partway into a second shift. Topcoating can start four hours later, and the floor can be returned to full service 12 hours after completing the topcoat.
 Resinous flooring systems offer anti-slip properties, cleanability, and resistance to chemicals, abrasions, moisture, impacts, and thermal shock.
Returning to Service Faster
Adding up the labor steps and overall curing time between the two systems, as shown in Tables 1 and 2, illustrates the efficiencies a facility can gain by selecting the urethane flooring system. To install the 10,000-ft2 meat processing facility floor using a conventional epoxy system, it could take up to five to six crew shifts and 100-102 total hours, including both application and curing times. For the urethane system, the totals drop to just three to four shifts and 40-52 total hours, depending on the use of a primer and the efficiency of applying the slurry coat.
The approximate total hours above represent the complete flooring installation time that could be realized if crews were to complete all steps continuously. More realistically, installers won’t run around-the-clock shifts. Assuming one eight-hour shift per day, the required steps and curing wait times could push a conventional epoxy installation up to five days, while the urethane system installation may only take as little three days.
Table 1. Shift (eight hours) requirements to install ¼-inch flooring systems throughout a 10,000-ft2 meat processing facility using a five- to seven-member crew.
|
Application Step |
Conventional Epoxy Mortar System |
Urethane Concrete System |
|
Surface Preparation |
1 shift |
1 shift |
|
Primer |
1 shift |
Optional; if applied: 1 shift |
|
Mortar Bed |
1-2 shifts (8-10+ hours) |
N/A |
|
Grout Coat |
1 shift |
N/A |
|
Slurry Coat |
N/A |
1 shift (8-10 hours) |
|
Topcoat |
1 shift |
1 shift |
|
TOTALS |
5-6 shifts |
3-4 shifts |
Table 2. Time requirements to install ¼-inch flooring throughout a 10,000-ft2 meat processing facility using a five- to seven-member crew.
|
Application Step |
Conventional Epoxy Mortar System |
Urethane Concrete System |
|
Surface Preparation |
8 hours |
8 hours |
|
Primer |
8 hours to coat 12 hours to cure before next step |
Optional; if applied: 8 hours to coat 2 hours to cure before next step |
|
Mortar Bed |
8-10 hours to install 12 hours to cure before next step |
N/A |
|
Grout Coat |
8 hours to coat 12 hours to cure before next step |
N/A |
|
Slurry Coat |
N/A |
8-10 hours to coat 4 hours to cure before next step |
|
Topcoat |
8 hours to coat 24 hours to cure before full return to service |
8 hours to coat 12 hours to cure before full return to service |
|
TOTALS |
100-102 hours |
40-52 hours |
Making a Flooring Choice
Faster flooring installations offer the potential to accelerate the entire construction or renovation process for a food manufacturing facility. Any efficiencies gained during the installation can enable work to resume sooner, equipment to be placed more quickly, and the facility to ultimately return to service faster.
As established, a urethane concrete flooring application can be completed much sooner than an epoxy mortar flooring installation, removing considerable downtime from a project. Urethane systems reduce application steps, application times, and curing times. They also offer some added potential benefits over conventional epoxy systems, including better resistance to thermal shock and chemicals. All of these features combined are making urethanes a growing flooring system of choice for food manufacturing facilities.